- Home
- How to Knit: Basics
- Knitting Charts
How to Read
Knitting Charts
Knitting charts and written instructions are equally useful for
gaining your mastery and having more pleasure from knitting. Very
many knitting instruction provide both versions of the pattern -
graphical charts and written descriptions.
Usually, when you ask "what is BETTER", the truth is located somewhere in between.
Your best tool is that one which you feel confident and comfortable working with.
This page will show you how to read charts for knitting presented in graphic symbols. Needless to say, it is not as difficult as it seems. Let's see how it works.
All designers describing their knit patterns in charts follow the same logic. This logic is based on common sense and a natural way of knitting.
It makes our life much easier if we read graphical charts instead of the word descriptions.
At the same time we have to say that knitting symbols for charts are not standardized.
Different sources of knitting patterns use (slightly) different symbols describing their patterns. Fortunately, each chart has a stitch key, which explains what kind of stitches has to be used, to knit the pattern.
Using Knitted Symbols Rather Than Words
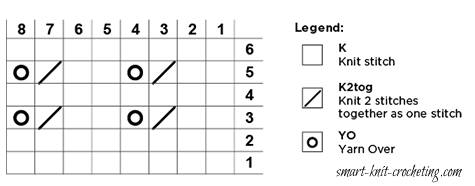 Simple Knitting Chart
Let's analyze the way we usually knit. 1-st row.
In the flat knitting the first stitch to knit is the very right one on the needle.
Direction of knitting is from right to left.
Once we reached the end of the row, we turn our knitting over and begin the second row facing the back of the work.
At the end of the second row we turn our knitting over once
again and facing the face of the work, and so on.
The boxes of
the knitting charts "behave" just like the stitches do on the
needles. We read the charts from right to left and from the bottom to the top. That probably sounds very odd to anyone in the Western World, but charts are meant to behave the way we knit. So how do we read a knitted chart.
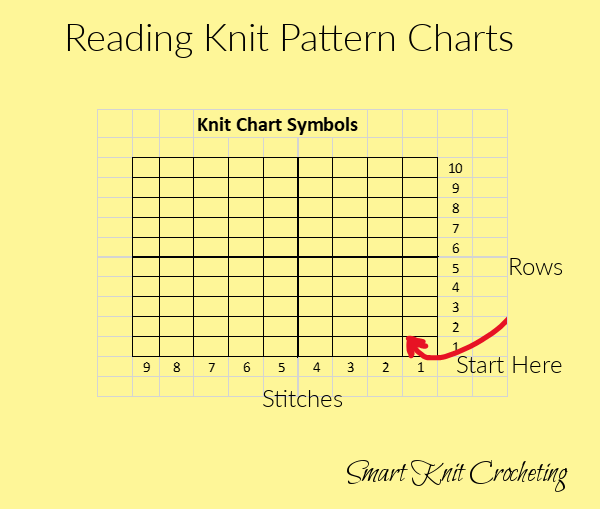
A very basic knit chart will look like a grid system with numbers running across the bottom and on the right side. The numbers at the bottom represent individual stitches and the numbers on the right represent rows. Each small square will contain a symbol.
Knitting Symbols
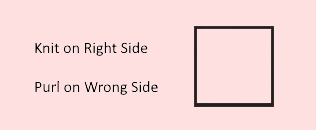
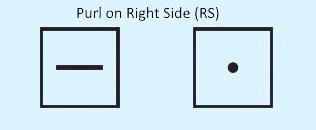
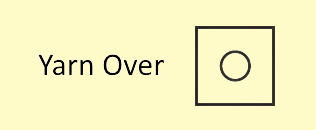
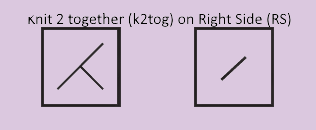
You normally won't need to memorize all of these symbols because most charts will provide a legend that tells you exactly what you need to know. Well-written modern patterns use the standardized system from the Craft Yarn Council.
For example, here are a few very basic symbols you might encounter.
Reading Knitting Charts: Simple Lace
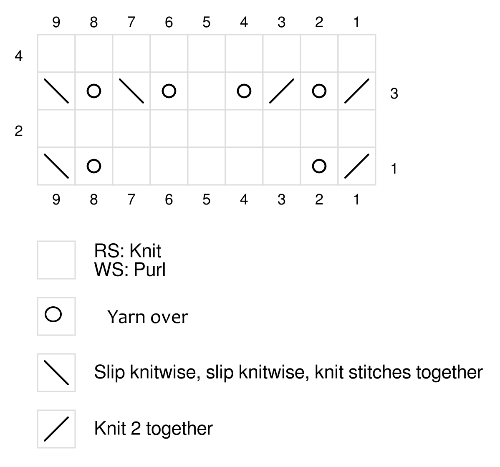 This is a very easy lace pattern that is appropriate for beginners.
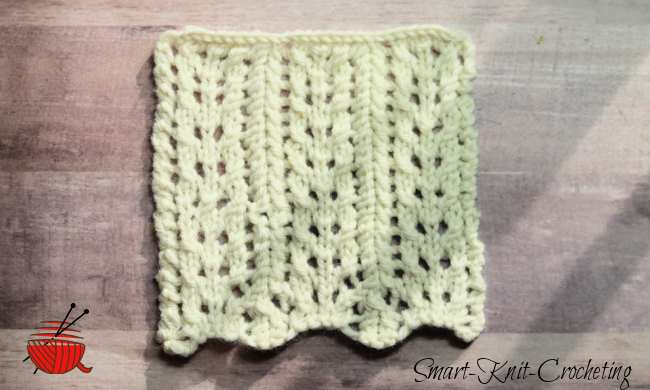 Simple Lace knitted based on the knitting chart above.
- Each cell/box of the knitting chart represents a stitch. Horizontal
rows of boxes are the rows of stitches.
- A stitch key or a legend tells you what each graphical
symbol/box in the chart means. As I already mentioned above,
knitting symbols are not standardized. Nevertheless, a stitch key
will always make knitting symbols clear for you. Here is a good set
of knitting symbols with detailed illustrations for
each knitting stitch.
- The right vertical column of the numbers shows odd rows of the
Right Side (RS) of knitting. Facing the Right Side of your
knitting, follow the chart reading it from right to left.
Exactly the way you knit your stitches.
- The left vertical column of the numbers shows even rows of the
Wrong Side (WS) of knitting. Direction of knitting on the Wrong
Side is the same: from right to left. Facing the
Wrong Side follow the chart, reading the symbols from left to
right.
Here is a written description for the same pattern.
This lace pattern is worked in 9 stitch repeats. For this swatch, I casted on 27 stitches using a long tail cast on method and used a US 7/ 4.5 mm. The swatch was worked in Cascade 220 Superwash Merino Wool.
The written instructions would look like this:
Row 1: (RS) *K2Tog, YO, K5, YO, SSK* Repeat to the end of row
Row 2: (WS) Purl
Row 3: (RS) * K2Tog, YO, K2Tog, YO, K, YO, SSK, YO SSK* rep to end of row.
Reading Knitting Charts: Moss Stitch
Below is an example of a knitted pattern chart for the Moss Stitch
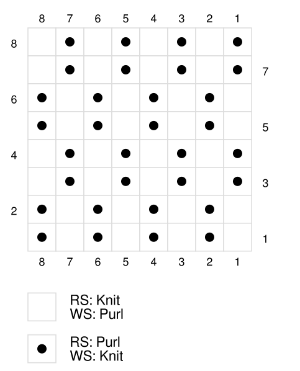 Knitted Moss Stitch
Reading Knitting Charts: Seed Stitch
Here's another knit chart for the Seed Stitch, which is very similar to the Moss stitch.
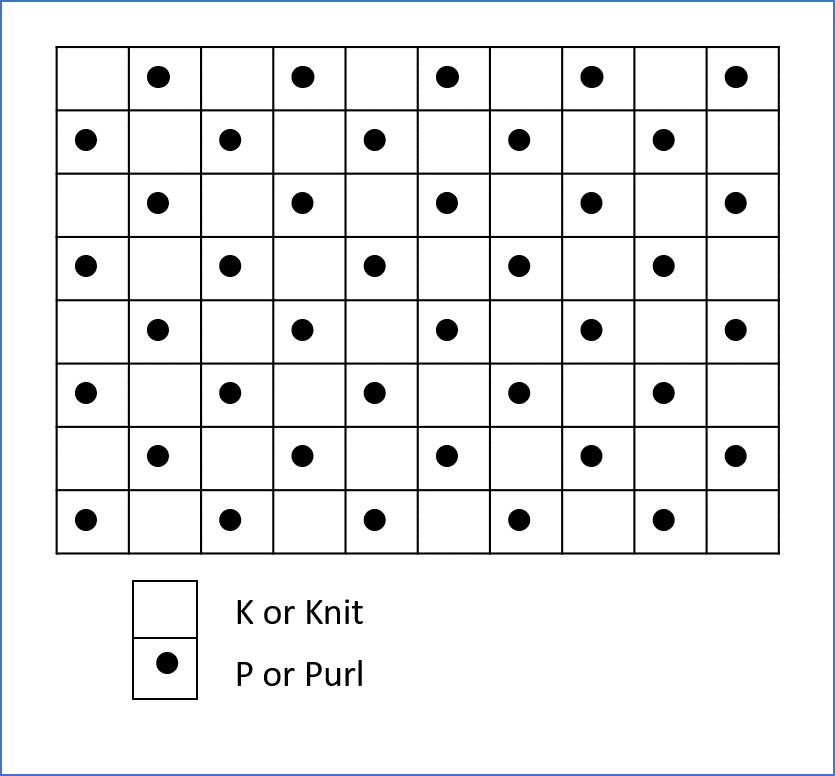 Knitted Seed Stitch
Which is Easier - Charts or Written Instructions
There's really no good answer here. Both are common ways the designer communicates the instructions for making the project. It's entirely up to you as to whether you feel most comfortable with a chart or would prefer to follow the written directions.
As your projects become more elaborate, you might find that charts are easier to follow. Written instructions are used almost entirely for easier patterns so as you progress in your knitting skills, your thoughts might change over time. It is also likely that you will find some projects easier to do with a chart, while others are much easier to understand with written directions.
Reading Charts Summary and Additional Hints:
- Each symbol presents certain kind of stitch.
- For Right Side Rows, follow pattern reading chart from right
to left.
- For Wrong Side Rows, follow pattern reading chart from left
to right.
- For circular knitting every row should be read in the same
direction.
- Be sure to read the chart before you start to knit. Very often
Wrong Side Rows are not shown on the chart. Remember to work
them!
- Watch for the pattern repeats. They usually are shown in a box
and help you to follow the knitting chart.
- Don't be confused if in some knitting charts you will see a "No Stitch" box. They are there for a good reason to show you how the pattern lines up. How should you treat them? Just DON'T PAY ATTENTION following the pattern chart. DO NOTHING. "No Stitch" means no stitch should be knitted there.
Knitting Charts: Pin for Future Reference
About Janice
Hi, I’m Janice, the voice behind Smart-Knit-Crocheting. I love to knit and crochet and even more, I love teaching others what I know.
Though I learned to knit and crochet as a child, I didn’t get serious about these amazing hobbies until I retired. I’m a certified knit and crochet instructor through the Craft Yarn Council and am working on becoming a Master Hand Knitter through The Knitting Guild Association.
I’m currently living with my husband of over 50 years and our 6 Shih Tzu dogs.
I love hearing from you, so please drop me a line and let me know what you’re working on, whether you love knitting or crocheting more, and if you have any questions. Please visit my about me page for more information.
Happy Crocheting
