- Home
- Organizing your knit crochet life
The Ultimate Guide to Organizing Your Crochet and Knit Life
Organizing Your Knit Crochet Life by Janice Jones
|Updated November 21, 2025
Organizing the stuff you acquire when taking up a hobby can be challenging. It's not just knitters and crocheters who find themselves surrounded by things they love but can't locate when they need them most.
All crafters share this problem – Too much "stuff," not enough space, and most importantly, the indecision on how to move forward to create a workable space for them.
You are likely here right now because you share this uncertainly. You are not alone. At some point, every crafter searches for the perfect tool, only to discover that it is either lost or buried deep in their "stuff.
At this point, most crafters realize that they need a system that works for them. Everyone has different interests and, above all, other things they have accumulated when starting their craft. I felt this when I scrapbooked, sewed, dabbled in card making, and now with knitting and crocheting.
What All Knitters and Crocheters Share in Common
Whether you love to knit or crochet, you have undoubtedly purchased a few supplies to use with your needlework.
- Yarn
- Hooks or Needles
- Notions such as scissors, tape measures, stitch markers, tapestry needles
- Books (how-to books as well as pattern books)
- Patterns from the Internet
- Favorite Bloggers or Sites You Frequent regularly
- Handy resources you regularly use, such as needle conversions, abbreviations, chart symbols
And last but not least, all the projects you are currently working on or plan to begin shortly. Wouldn't it be nice to find a system that works for you?
Organizing Your Knit-Crochet Life: Table of Contents
1. Separate everything into piles
3. Organize Your Knitting Needles and Crochet Hooks
4. Organize Your Other tools and accessories
5. Paper Resources: Downloaded patterns and tutorials
One Size Doesn't Fit All: Organizing Your Knit Crochet Life
We may all enjoy working on different projects, using different kinds of yarn, or having various tools. You may have many double-pointed needles or have tried every hook that passes by your radar.
Others may not have double-pointed needles but several complete sets of circular needles. We are all different, but we all have a few things in common.
- We all need yarn to complete our projects
- We need some hooks or needles
- We have gathered some accessories to help us along the way, such as scissors, stitch markers, or yarn bowls.
- Most of us have used the internet or YouTube to discover new techniques or taken a class to help us improve our skills.
Unless you have a miraculous memory, you may not remember everything you own or the place on the net that was the most helpful. This is why you need a system of organizing your crafting life.
I got to this point a while ago. I decided I needed to do something quickly because I found myself purchasing duplicate items I didn't need. It was not only costly but wasteful too.
Steps to Organizing My Knitting and Crochet Life
Here is my six-step plan for getting organized, and hopefully, you will find it helpful too. Don't worry if you can't complete all of these steps immediately.
Most can't, so take your time and make your organizational system your own. Organizing yarn is usually the most time-consuming, so if you prefer, jump around and choose a step based on your time constraints.
Organizing Your Knit Crochet Life
Step 1: Separate Everything I Own Into Piles
- Yarn
- Knitting Needles (by type – straight, double-pointed, circular, sets)
- Crochet Hooks
- Small Items (cable needles, stitch holders, stitch markers, rulers, scissors, and tape measures)
- All printed patterns I had downloaded with the hope of trying at some point
- All free handouts associated with classes I have taken
- All helpful articles that I had printed.
- Books and Magazines (Not everyone likes to print out more paper copies of things they see, so if that is you, come up with a system of bookmarking sites that you love or find helpful. The same is true of Videos and YouTube Channels.)
Step 2: Your Yarn Stash
If you sew, you collect fabric, and if you scrapbook, it's paper, and the yarn is what we love to collect as knitters and crocheters.
If this is your passion, you might purchase yarn in bulk during great sales or visit a festival or yarn store while on vacation.
You may find yourself enamored with a new type of yarn without a project in mind. And, let's face it, we all have purchased yarn that we don't use, now or ever.
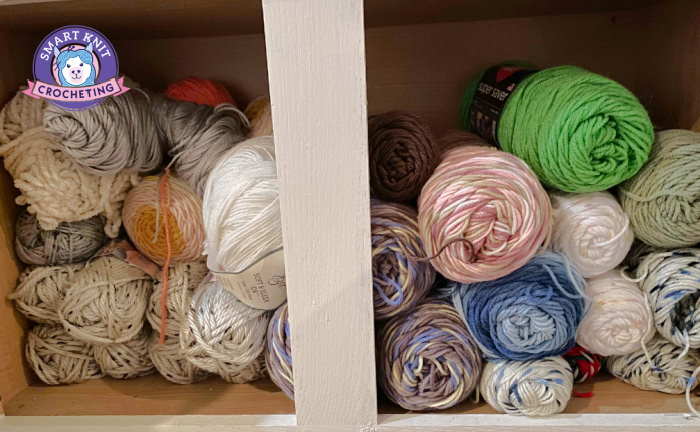
So the next step is to find a way to organize all that yarn. First, I took out all the hanks and skeins I owned and spread them on the floor. I chose to separate it by fiber, so all of the yarn that was 100% wool went into one pile and 100% cotton in another heap.
Acrylics and blends were separated and placed in yet another pile. This left all the leftover yarn that I had hand-wound into balls.
I didn't remember their fiber for many, so classifying those "mystery" yarns is the subject of another article.
For now, all yarn is separated into fiber types. From there, I subdivided the yarns into yarn weights and then colors.
You may decide to organize your yarn by color or weight, which is perfectly fine. Suppose you have been knitting or crocheting for some time. In that case, you may also prefer to classify by age - with the older yarns being separated from, the more recent purchases.
How to Store Yarn
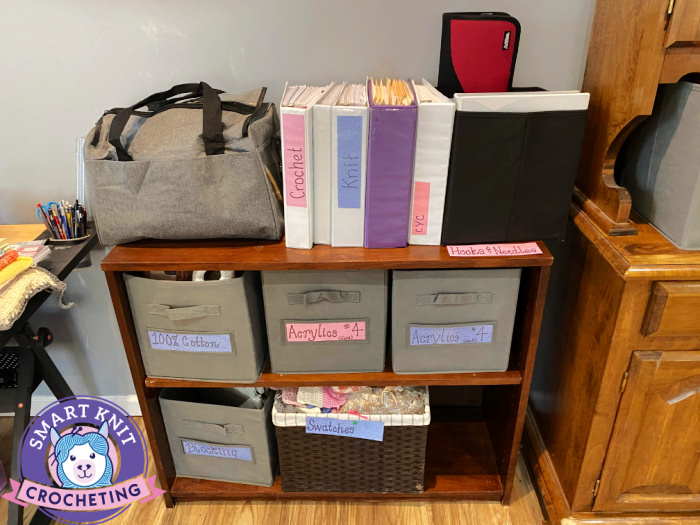
It is preferable to store yarn in a cool, covered place so the yarn remains clean. I like see-through plastic containers that I can pile up, each marked with the type of yarn.
You may already have shelves or a cabinet where your yarn can remain clean and dry, which is perfectly fine. Check to ensure that yarn ball labels are still attached so you can identify the yarn later on.
Inventory Your Stash
Keeping an inventory of what you have is suitable if your stash is large or you are just beginning to acquire a yarn stash.
Some prefer to do this by paper and pencil method; others may find keeping records on their phone more accessible and more convenient. I like to have a hard copy of my stash inventory, so I have created forms I can use for that purpose. You can also use the notepad app that most smartphones already have installed.
Here are some information to record for your yarn stash.
Name of Yarn: _________________ Yarn Weight:________
Manufacturer:___________Fiber Content: _______________
Number of skeins:_________Color:________Dye Lot:______
Size: _______ yards/meters
Step 3: Organize Your Knitting Needles and Crochet Hooks
If you enjoy knitting and crocheting, you will have collected a mass of hooks and needles. It's always frustrating to spend hours looking for the right hook or needle size, so that is why we conquer the tools of our trade next.
Crochet Hooks
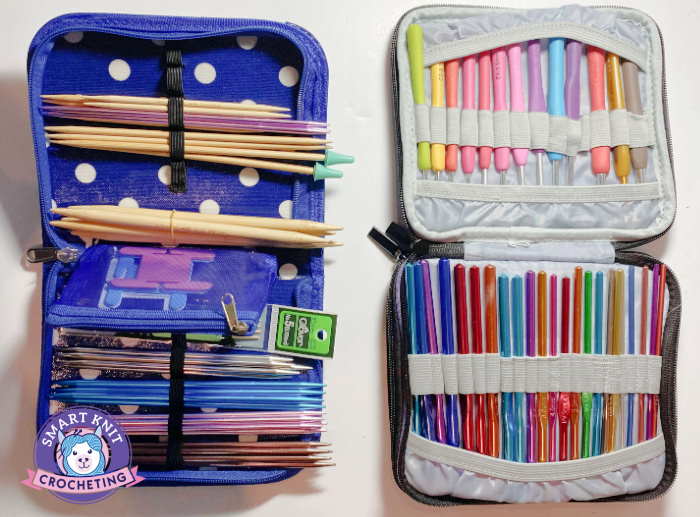
If you have one or more different types of sets of hooks, first separate the sets. Each set deserves its container, whether it is the pouch that the set comes in or something else.
If they don't have a separate hook case, consider using a pencil case, makeup bag, or even a sturdy zip-lock storage bag. I have separated my hooks into several categories, including metal ones, ergonomic hooks, and wooden, bamboo, or resin hooks, and then split them again based on their manufacturers.
Knitting Needles
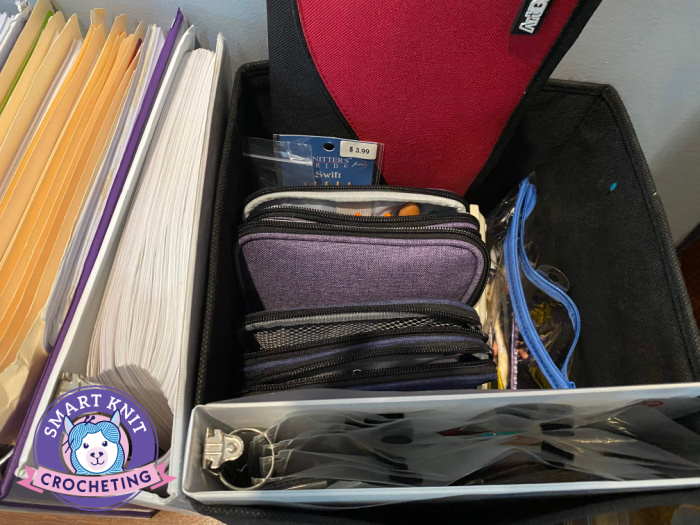
I have three major types of knitting needles: Straight (in two lengths), double-pointed, and circular.
From there, I need to separate them by size, that is, the diameter of the needle. I chose to classify my needles by type first.
All the straight needles went into one pile, all the double-pointed needles went into a separate pile, and finally, all the circular needles went into the third grouping.
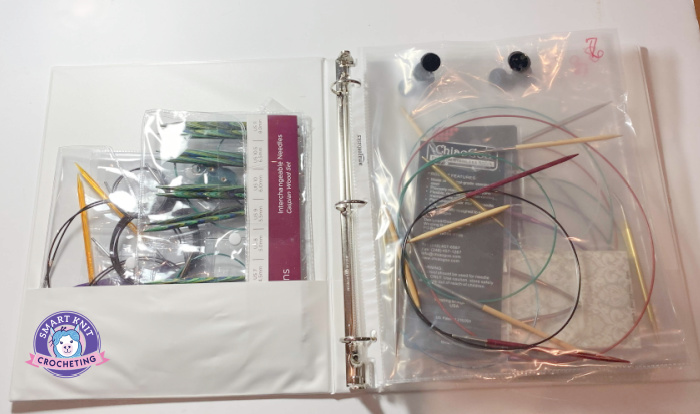
Some needles were part of a set and kept together in their original packaging. All the rest were to be organized next.
Wood, bamboo, plastic, steel, and aluminum made up most of my needles. It was easy to see the composition of the needles in my collection, so I didn't feel the need to separate them further. What was more important to me was finding the size I needed quickly.
Before organizing by size, I matched up the needles. I wrapped a small rubber band around the pair so that they would remain together.
Next, I checked each needle to see that the size was etched or printed on the needle.
I divided all my needles into several different containers. My double-pointed needles were stored in a simple crochet hook pouch, and the long straight needles found a place in a needle case for that purpose.
Using page protectors labeled by size, I organized stray circular needles in a 3-ring notebook. Any circular needles I owned that were purchased as a set remained in the original packaging.
The remaining were straight 10-inch long needles made of wood, bamboo, plastic, and aluminum in various sizes. How was I going to sort them?
The first step was to secure each pair with a small rubber band, and I added a small slip of paper between the rubber bands, noting their size. Now, how to store these needles?
It turns out that I have a drawer that worked perfectly. I was able to line the drawer with dividers so that I could divide the needles into roughly equal parts. (For me, this meant needles US 5 and under in one group, Sizes US 6 to 9 in the second group, and those US 10 and larger in the third group.
All my significant hooks and needles now had a home, and I could keep them all nearby.
Step 4: Organizing Other Tools
I find myself using the same accessories over and over again when I knit and crochet:
- Stitch markers (those for only knitting, only crocheting, and those that can be used for both)
- Scissors
- Small rulers, larger rulers, tape measures
- Assortment of tapestry needles
- Stitch holders and cable needles
- Straight pins, blocking boards
- Pencils and Pens
- Notebooks and paper
- Row counters
- Project bags
The next challenge was to find a way to keep all these accessories handy and ready to use at a moment's notice.
Suppose you regularly work on more than one project at a time.
In that case, you will need a separate project bag for each and all the other supplies mentioned above. I like to keep all the small notions and supplies in a central place where I can find what I need quickly.
When I start a new project, I make a small bag of supplies based on the pattern.
I learned this the hard way. At first, I filled up a small container with all those extras and placed the container in my project bag.
After a while, I realized I didn't need ten tapestry needles and 50 stitch markers for each project and didn't need knit stitch markers when I was crocheting.
All those little supplies found a drawer that kept them safe and provided access when required.
Many options exist for keeping little supplies readily available in your project bags. The simplest is a ziplock sandwich or quart-size plastic baggies.
But that is only one idea. Here are a few other options, many of which you already have lying around your home.
- zippered pencil bag or case
- Small makeup bag
- Food storage containers with a tight lid
- DIY small knit, crochet, or sewn fabric zippered pouch
- Disposable plastic pouches containing shipped items such as makeup or medications. I purchase a lot of dog supplies online and permanently save the containers.
Project bags were not fancy. I used a variety of bags that worked fine. Since I usually have several projects in the works simultaneously, what I had available is what I used.
My favorite project bags were reusable market bags I collected over time, making them the most cost-efficient bags to use. I also used:
- Store-bought knitting and crochet bags
- Bags that came with Yarn Purchases
- Plastic gallon size storage bags'
- Recycled plastic bags from other online purchases
- Old recycled purses
I prefer bags over boxes, such as plastic containers, for projects because most of my knitting and crocheting is not stationary. I work on projects on the run or even carry tasks from room to room in my home, making boxes a bit cumbersome.
Step Five: Paper Resources Critical to Knitting and Crochet Success
Do you save paper copies of patterns, free downloads, or tutorials? OK, I'll admit, I do, and even though I once dreamed of a paperless office and home, I have not lived long enough to see that reality.
I like to keep free patterns in paper form in case I can't access them online. This is especially true when I travel. There is no guarantee I can continue to knit or crochet when I travel without a reliable internet connection.
The next best thing is a paper copy. I also love paper because I can jot down notes or just pencil in where I leave off. But what to do with all that paper?
Organizing Your Printed Patterns
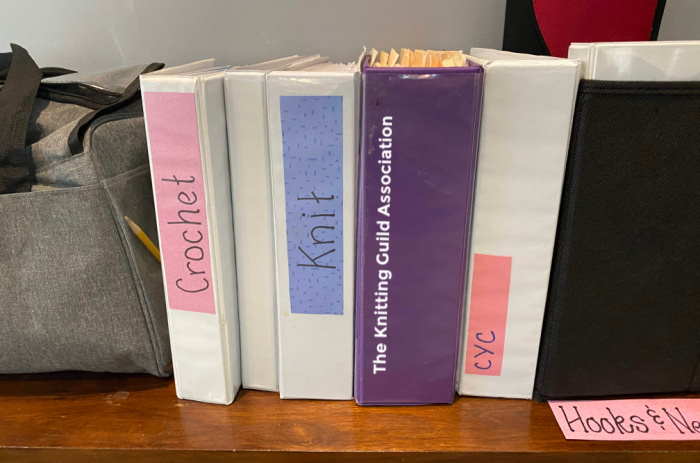
Patterns are no good if you can't find them. I find the easiest way to organize all those patterns I hope to make someday is to file them in a notebook or file cabinet.
Plastic file boxes are inexpensive, and can hold hundreds of patterns, and a three-ring notebook works equally well.
Since loose-leaf notebooks fit on the same shelf as my growing library of knit and crochet books, I chose that option.
Before purchasing a notebook, establish what quantity of hard-copy patterns, tutorials, or stitch pattern directions you want to file. This will determine what size and how many notebooks you will need.
My filing system consists of
- Three-ring notebooks
- Dividers
- Plastic page protectors
- Labels
Set up a filing system
A filing system is very personal and geared to what works best for you with the resources you want to file away.
Consider how you want to proceed if you are making it to a file box or a notebook. Here are a few category topics you might want to use. Some will work for you, and others you will want to disregard.
Pattern Classification System
Determine if you want your pattern collection to be segmented into knit and crochet patterns or lumped together.
Next, look at the type of patterns you have collected. Here are some topics to consider but again, this is a personal choice. You can proceed broadly and then narrow the categories.
For example, if you only have a few patterns, consider dividing them into wearables, home accessories, toys, and children. As you collect patterns, your classification system may look like this.
File Classifications
Home Accessories
Blankets, Afghans, Pillows, Dishcloths, washcloths, placemats, towels, coasters, Accessories, containers, cozies
Women's Clothing
Sweaters, vests, tops
Hats, mittens, scarves, cowls, shawls
Men's Clothing
Sweaters, vests, ties, shirts
Hats, mittens, scarves, cowls
Babies, Toddlers, and Children
Sweaters, Tops,
Layette items
Blankets, lovies, toys
Hats, scarves, mittens, and gloves
Alternatively, you may want to organize your pattern collection according to the types of yarn to use, length of time to make, or ultimate cost.
Once you decide on your classification system, the rest is easy. Print or write labels and file patterns accordingly. You may also want to jot down a table of contents or reference page listing your available patterns for easy reference.
Other Paper Documents
If you collect other printed downloads, you will want them to have a prominent place in your craft room or corner. I found an extensive collection of free downloads from courses I had taken over the years. I decided I'd like to refer to them from time to time, so I wanted to keep them, but how?
Again, I chose the notebook filing system using the same supplies mentioned above. I highly recommend a table of contents or reference page for resource sheets containing tutorials, stitch glossaries or handy tips. It's much easier to know what you are looking for and access it quickly.
There is plenty to remember when knitting and crocheting, and knowing where to find the information will leave more time for crafting.
Step Six: Books and Magazines
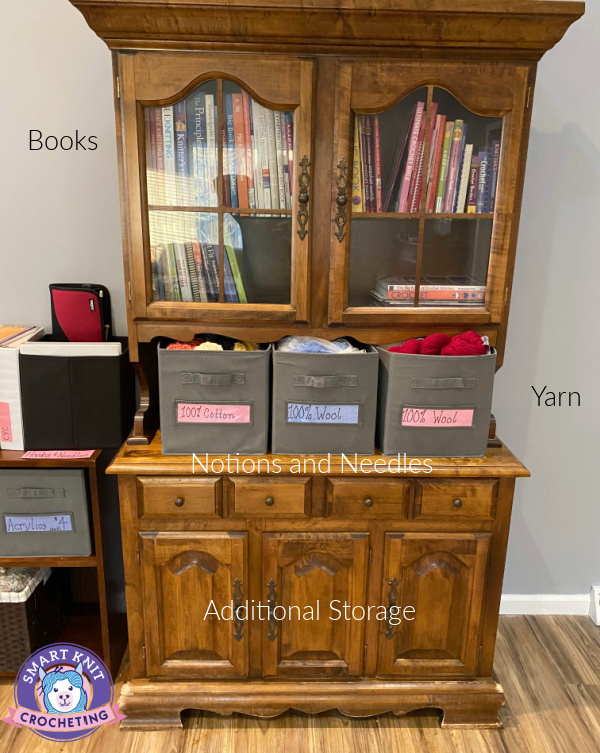
Most people overlook this last step, especially those who collect books. All those prized printed works get placed on a book shelf, if there is room and if not, piled in the corner.
We are not trained librarians, so our book collections tend to be organized by systems that professional librarians would never recognize. Yet, there are ways that we can make our book collections work for us.
I have a small but growing group of printed works, and I will tell you how they are displayed on my shelves.
Since this website is all about knitting and crocheting, I have books that fall into those two categories. There are general technical references, stitch directories, pattern books, and then books about specific techniques such as Fair Isle Knitting.
I also have a few volumes about fibers and a few history books. These are the topics that interest me. Once I realized which topics were in my little library, I organized them accordingly.
All books about crochet are separated from knitting books, and all books that pertain to fibers are in their little grouping. Pattern books are divided, and any miscellaneous books are in a section all their own.
Conclusion
There are so many ways to organize a space devoted to knitting and crocheting; this is just one crafter's way of making it work.
There is no right or wrong way to organize all the supplies one accumulates when knitting or crocheting. It is a personal decision, but one thing is universal.
The organizational system must work for the individual. I have provided one approach that might inspire you to organize your space to make it your own. Organizing requires consideration and mindfulness and is only successful if the outcome allows you to work smarter, not harder.


