- Home
- Crochet Stitches
- Crochet Slip Stitch
Crochet Slip Stitch
By Janice Jones |Last Updated November 2025
The crochet slip stitch is one of the simplest, yet most useful stitches you’ll ever learn. It’s perfect for joining rounds, creating neat edges, or adding decorative texture. If you’re new to crochet, mastering this tiny stitch is not only easy but also essential for beginning any new crochet project.

Slip Stitch Abbreviations: sl st or ss
If you are using a pattern, you will see the slip stitch abbreviated as sl st or ss. The Crochet slip stitch is called the same in both the US and UK, but in the US, it is abbreviated “sl st," and in the UK, it is often abbreviated “ss.”
The symbol for the slip stitch is “•” which can be seen in crochet charts.
How to Make the Slip Stitch in a Row
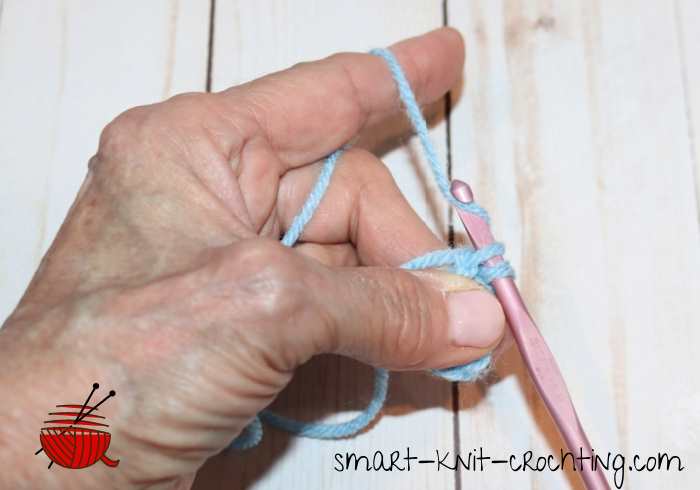
Make a foundation chain to the length required and add one chain. Insert the hook into the second chain from the hook.
Turn the hook so it is facing you, wrap the yarn around the hook and draw through both stitches.
To continue, insert the hook into the next chain stitch, wrap the yarn around the hook and draw through both stitches. Continue in this manner for the rest of the row.
How to Use the Slip Stitch Crochet to form a Foundation Ring

Basic Crochet Stitches
As you learn to crochet, you will discover that there are only a few basic stitches to master, with the slip stitch being one of them.
Crochet Stitch Comparison Table
| Stitch Type | Abbreviation | Height | Yarn Over Before Insert? | Common Uses | Key Difference |
|---|---|---|---|---|---|
| Slip Stitch | sl st | Shortest (no height) | No | Joining rounds, finishing edges, surface crochet | Creates a flat join — no height added to your row |
| Single Crochet | sc | Short | No | Dense fabric, amigurumi, dishcloths | Simple, tight stitch that builds structure |
| Half Double Crochet | hdc | Medium | Yes (once) | Blankets, scarves, garments | Slightly taller than sc; softer, flexible texture |
| Double Crochet | dc | Tall | Yes (once) | Shawls, granny squares, open patterns | Twice as tall as sc; faster to work, more drape |
| Treble (Triple) Crochet | tr | Tallest | Yes (twice) | Lacework, decorative rows | Long, airy stitch with pronounced gaps |
Ways to Use the Slip Stitch
Here are ways to use the crochet slip stitch:
- Make a slip stitch to join the ends of a foundation chain to form a ring.
- Use a slip stitch to join work when working in rounds.
- Use slip stitches to seam two pieces of crochet fabric.
- Make slip stitch edging to finish a project.
- Decorate with a slip stitch on top of the crochet surface
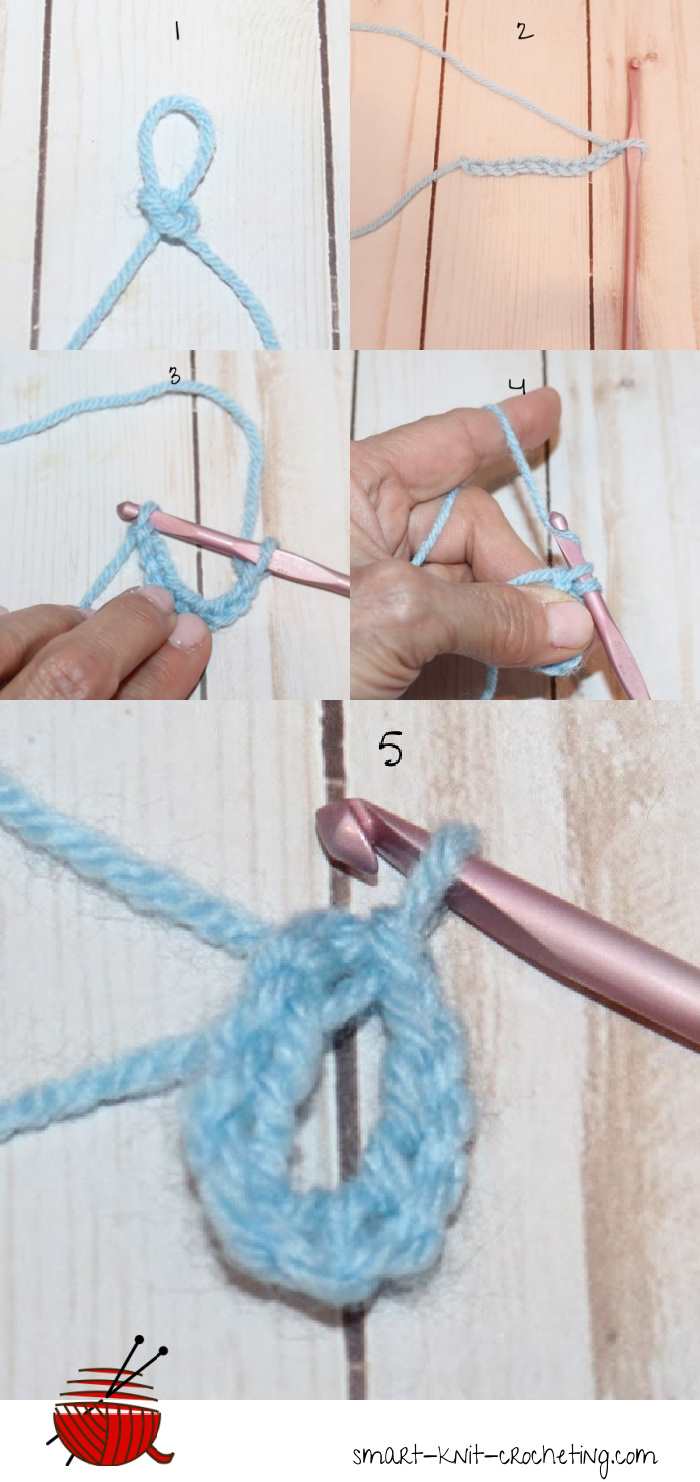
1. Join the Ends of a Foundation Chain to Form a Ring
- To begin, make the required number of chain stitches for the ring. For example, your pattern might call for creating 4 chain stitches and then joining with a slip stitch. (Ch4, join with a sl st to form a ring)
- Insert the hook through the first chain stitch made. Wrap the yarn around the hook and draw up a loop. Pull through the loop and the stitch on the hook.
This is one method you can use when working in the round such as granny squares.
2. Join the End to the Beginning of a Round
- Work to the end of a round of crochet.
- Follow the pattern direction or add a slip stitch to the first stitch or top chain of the previous round.
This is another way of joining rounds
3. Use a Slip Stitch to Seam Two Pieces of Crochet Fabric
A slip stitch seam can be used to join two separate pieces of crochet fabric. I use this method sometimes when I stitch granny squares together.
- Hold two pieces together with right sides facing.
- Insert the crochet hook into the outer or top loop of the first piece and then the outer or top loop of the second piece.
- Yarn over and pull through the loops on both pieces of fabric.
- Locate the next two outer loops and repeat step 3 above.
- Repeat these steps until you have seamed the side of the fabric.
4. Using the Crochet Slip Stitch as an Edging
Flat Contrasting Edge

There may be a couple of reasons why you might want to use the slip stitch as an edging around a piece of fabric.
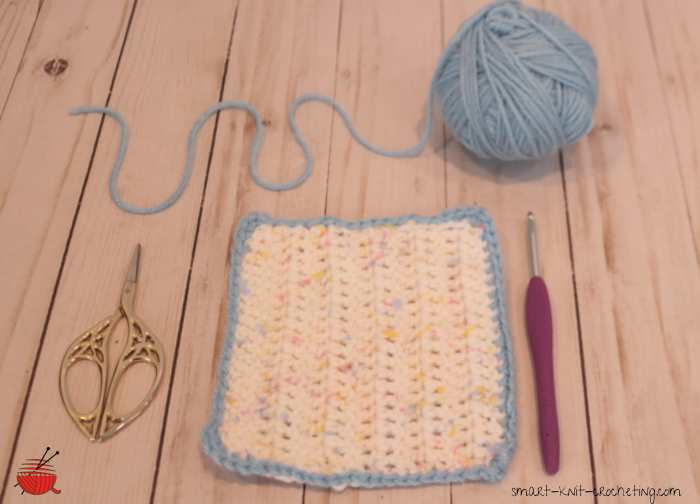
First, if you are looking for a very simple edge, say in a different color, the slip stitch won't add much to the length or width, but it can add a bit of contrast.
To add a slip stitch edging, simply go around the finished fabric working into the stitches you've already finished. Don't pull to tight or the fabric won't lay flat.
Stabilizing Edge
If you are working a lacy fabric and the edge is too flimsy, you might decide to stabilize it with a row of slip stitches in the same color and fiber as the finished piece. Don't pull each stitch too tight. You'll find that a slip stitch edge is nearly invisible by doing it this way.
5. Decorate With a Slip Stitch on Top of a Crochet Surface
You can add a decorative touch that looks like an embroidery chain to a finished crochet fabric by working a slip stitch on the front of the fabric.
To work the Decorative Slip Stitch:
- Make a slip knot, and hold the knot at the back of your work.
- Insert the hook from front to back through the fabric, and pick up the slip knot on the hook.
- Pull up the loop through to the front side of the work, but keep the knot at the back.
- Insert the hook into an adjacent stitch
- Yarn over and pull through the work and the loop on your hook.
- Repeat steps 4 and 5 until your design is done.
- Clip the yarn leaving a 5 to 6 inch tail and insert it through the fabric to the back side. You will need to weave in that tail when doing the others.
Frequently Asked Questions
What is the purpose of a slip stitch in crochet?
What is the purpose of a slip stitch in crochet?
The slip stitch is used to join rounds, finish edges neatly, or move your yarn across a project without adding height. It’s a basic but essential stitch for creating smooth, seamless transitions in your crochet work.
Is a slip stitch the same as a single crochet?
Is a slip stitch the same as a single crochet?
No. The slip stitch is much shorter than a single crochet and doesn’t add height to your row. A single crochet builds fabric, while a slip stitch connects or finishes it.
Why do my slip stitches look too tight?
Why do my slip stitches look too tight?
Tight slip stitches happen when you pull your yarn too firmly. Try loosening your tension or using a slightly larger hook to make the stitches more straightforward to work with.
Conclusion
While the crochet slip stitch is normally not used to create fabric, it is, nevertheless, a very useful stitch for the beginner to learn.


