- Home
- Crochet Stitches
- Crab Stitch
Crochet Crab Stitch: Uses and How to Instructions
(a.k.a. Reverse Single Crochet, Corded Edge)
Crab Stitch Rewritten by Janice Jones |Last Updated December 2025
Most beginners get confused the first time they try the Crab stitch because it forces them to crochet “backwards.”
That reverse motion gives the edge its corded, decorative look—but it also makes the stitch feel unnatural until you understand the mechanics.
Once you know why it works, the different names (reverse single crochet, shrimp stitch, corded edge) finally make sense.
In this post, I’ll show you exactly how to crochet it with confidence.

Uses for the Crab Stitch or Reverse Single Crochet
The crab stitch is a versatile, decorative edging that works with both crocheted and knitted fabrics. Here are some of the most common ways to use it:
-
Finishing borders:
It creates a neat, structured edge that helps prevent rolling while adding a clean, rope-like detail. -
Shaping armholes and necklines:
The stitch helps soften the look of stepped decreases, rounding out areas where shaping is visible. -
Framing zippers or openings:
Crocheting a clean row of stitches along an edge before adding a zipper gives it a crisp, professional finish. -
Fixing stretched or wavy edges:
Perfect for sleeves, sweater hems, or dress edges that have loosened over time. If the edge doesn’t fit correctly on the first attempt, simply adjust your foundation single crochets until it lies flat, then work the crab stitch on top.
How to Crochet a Crab Stitch
If you see this stitch in a written pattern, it may be listed as reverse single crochet or rev-sc.
Because the crab stitch works best on a row of single crochet stitches, the easiest way to learn is to first make a small practice swatch.
Crab Stitch Tutorial

Materials Needed for the Crab Stitch Border
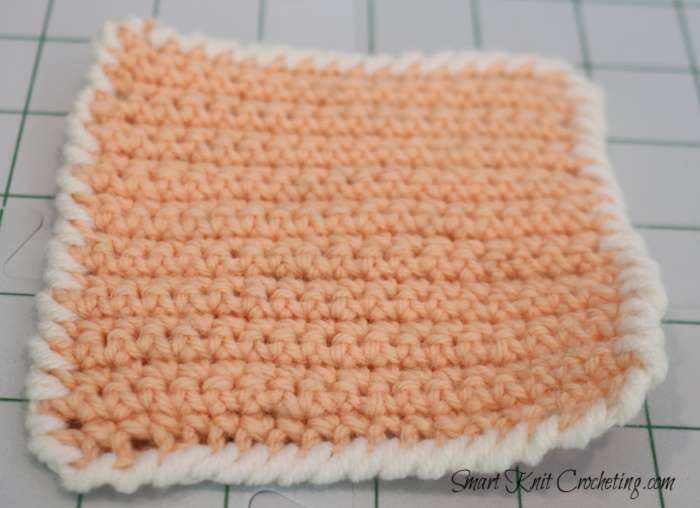
For this tutorial, I created a simple single crochet square using:
- Hook: 4.5 mm (US 7)
- Yarn: Red Heart Super Saver, Worsted Weight (#4) or any worsted-weight yarn.
- Scissors
- Tapestry Needle (for weaving in ends)
Using a smaller hook creates a firm square, which is excellent if you want a coaster. For practice or a softer edge, feel free to try a larger hook.
Abbreviations Used in this Crab Stitch Tutorial
- sc Single Crochet
- ch Chain
- sl st Slip stitch
Directions for Making the Crab Stitch or Reverse Single Crochet
Directions for Making the Crab Stitch (Reverse Single Crochet)
- Create a practice swatch: Ch 21. Turn.
- Row 1: Sc in the second chain from the hook, then sc across the row.
- Rows 2–20: Turn, ch 1. Work 1 sc in each sc across the row. Repeat until your square measures roughly 4.25 inches (20 rows × 20 stitches).
Bind off. You can weave in the ends now or wait until after adding the crab stitch border.
Adding the Crab Stitch Border

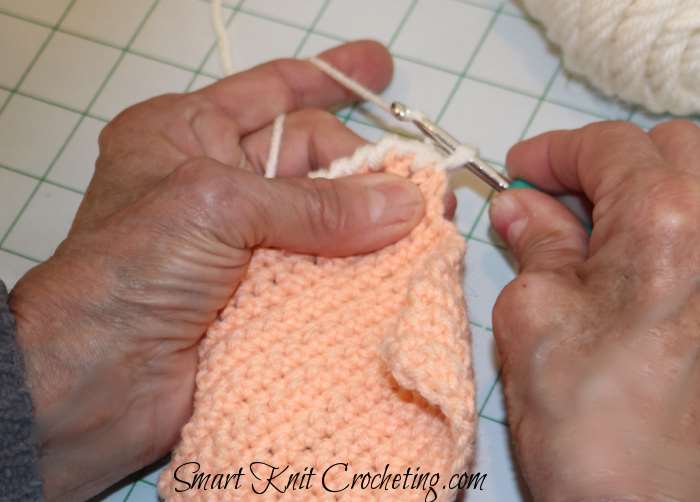
- Insert your hook into the stitch to the RIGHT. (This is the opposite of your normal direction—don’t worry, it will feel strange at first.)
- Yarn over and pull up a loop. You now have two loops on your hook.
- Yarn over again and pull through both loops. You’ve made one reverse single crochet (crab stitch).
- Continue working into the next stitch to the RIGHT.
The motion will gradually become smoother and more rhythmic.
When you reach the end of the round, slip stitch into the first crab stitch, cut your yarn, and weave in the ends.
Crab Stitch Questions & Answers
Why not just work a round of regular single crochet around the edge?
Why not just work a round of regular single crochet around the edge?
You absolutely can, but the look will be different. A row of standard single crochet creates a clean edge, but the crab stitch adds a firm, decorative, cord-like finish that really elevates the project.
Do I need to add extra stitches at the corners?
Do I need to add extra stitches at the corners?
Not usually. The crab stitch naturally creates a rounded edge.
However, if you prefer a sharper, more mitered corner, you can create one—just work it like a granny square corner:
sc, ch 1, sc in the same space.
Troubleshooting the Crab Stitch (Reverse Single Crochet)
Even experienced crocheters sometimes struggle with the crab stitch the first few times they try it. If your stitches look twisted, tight, uneven, or nothing like the photos, you are not doing anything wrong; you just need a couple of simple adjustments.
Here are the most common problems and how to fix them.
1. “My crab stitch feels too tight, and I can barely move the hook.”
This is the most common issue.
Fixes:
- Loosen your tension — consciously relax your grip on the yarn.
- Use a larger hook — even going up one size can make the stitch smoother.
- Pivot your wrist slightly as you insert the hook to the right. You’re now moving in the opposite direction, which requires a little extra flexibility.
Once your muscles learn the motion, the stitch becomes much easier.
2. “My edge looks uneven or bumpy.”
This usually means your hook placement is inconsistent.
Fixes:
- Always insert your hook under both loops of the stitch to the right.
- Slow down and make sure each stitch is worked into the same type of space.
- If you’re working around a corner, avoid “guessing” where the stitch goes—pick a clear, clean spot.
Even two or three slow, intentional stitches can reset the entire round.
3. “My crab stitch doesn’t look like a cord — it just looks messy.”
If your stitches don’t spiral in the same direction, tension is the culprit.
Fixes:
- Keep your tension even from one stitch to the next.
- Make sure your yarn over is always done from back to front, just like a regular single crochet.
- Double-check that you’re actually working right to left—it’s surprisingly easy to slip back into regular single crochet mode.
When the tension evens out, the corded look suddenly appears.
4. “I can’t figure out how to turn the corners.”
Corners can feel tricky the first time.
Fixes:
- For softer, rounded corners: Nope — it really does feel strange at first! You’re simply retraining your hands. Simply work one crab stitch into each stitch around the corner. This naturally curves the edging.
-
For sharper, mitered corners:
Work sc, ch 1, sc in the corner stitch before continuing the crab stitch pattern.
Try both and decide which one looks best for your project.
5. “The stitch feels awkward and slow — am I doing it wrong?”
Nope — it really does feel strange at first! You’re simply retraining your hands.
Fixes:
- Practice on a small swatch first (your idea of a coaster-sized square is perfect).
- Focus on the rhythm rather than speed.
- After 10–20 stitches, most people report that the movement suddenly becomes much more natural.
If it feels weird, you’re probably doing it exactly right.
6. “The stitches twist in different directions.”
This happens when the hook rotates without you realizing it.
Fixes:
- Keep the hook facing slightly upward as you pull through the loops.
- Try crocheting a bit more slowly until your hand memorizes the angle.
After a few rows, your stitch orientation becomes consistent.
7. “What if I mess up? Can I rip it back?”
Absolutely. Frogging the crab stitch is easier than it looks — just pull the yarn gently, and the stitches release cleanly.
If the yarn snags, loosen your edge slightly with your fingers before continuing.

Common Mistakes When Crocheting the Crab Stitch
Even though the crab stitch is only a single crochet worked in reverse, that one small change can cause some big (and very normal!) beginner hiccups.
Here are the most common mistakes and exactly how to fix them.
Working in the Wrong Direction
Mistake: Crocheting left to right on the first stitch, then accidentally slipping back into the usual right-to-left direction.
How to fix it: Pause every few stitches and check your direction.
Remember: if it feels a little weird, you’re probably doing it correctly.
Keep your hook pointed slightly toward the right to help reinforce the movement.
Gripping the Yarn Too Tightly
Mistake: Holding the yarn so tightly that the stitch becomes stiff, tiny, or impossible to pull through.
How to fix it:
- Try relaxing your shoulders and hands.
- Move up one hook size if needed.
- Practice on a small swatch until your hand loosens naturally.
Inserting the Hook Under Only One Loop
Mistake: Placing the hook under just the front loop or back loop, which makes the edge look uneven or floppy.
How to fix it:
- Insert your hook under both loops of each stitch unless the pattern says explicitly otherwise.
- Slow down for the first few stitches so your hand learns the motion.
Skipping Stitches Without Realizing It
Mistake: The reverse movement makes it surprisingly easy to miss a stitch, especially on textured edges.
How to fix it:
- Count your stitches every few rows.
- Make sure you insert the hook into a clearly defined stitch, not between stitches.
- Good lighting helps!
Expecting It to Look Perfect on the First Try
Mistake: Thinking the stitch looks “wrong,” when in reality it’s just new, and your hands need time to adjust.
How to fix it:
- Give yourself several rows before judging the results.
- Try a practice swatch before adding the stitch to a real project.
- Remember: the crab stitch is one of those techniques that suddenly “clicks.”
Final Thoughts
The crab stitch is one of those techniques that looks far more complicated than it is. Once you learn to work from left to right, the stitch becomes rhythmic, relaxing, and incredibly useful.
Use it to add structure to sweaters, finish crochet blankets, refine neckline shaping, or give your project that crisp, decorative edge that makes handmade look beautifully finished.
Further Reading
One of my favorite crochet handbooks is called Complete Crochet Course: The Ultimate Reference Guide by Shannon and Jason Mullett-Bowlsby. I used this reference in writing this tutorial.


