- Home
- Types of Knit Stitches
- Knitting Rib Stitches
- Slip Stitch Rib
- 1 x 1 Ribbing
1 x 1 Ribbing: How to knit this Rib and Do it Neatly
How to Knit the 1x1 Rib Stitch: A Beginner's Guide
If you're new to knitting, learning the 1x1 rib stitch (also known as the one-by-one knit rib, k1, p1, or 1x1 ribbing) is a great way to expand your skills. This versatile stitch pattern creates a stretchy, textured fabric perfect for various projects. This article will cover making a rib stitch and provide tips for improving your technique.
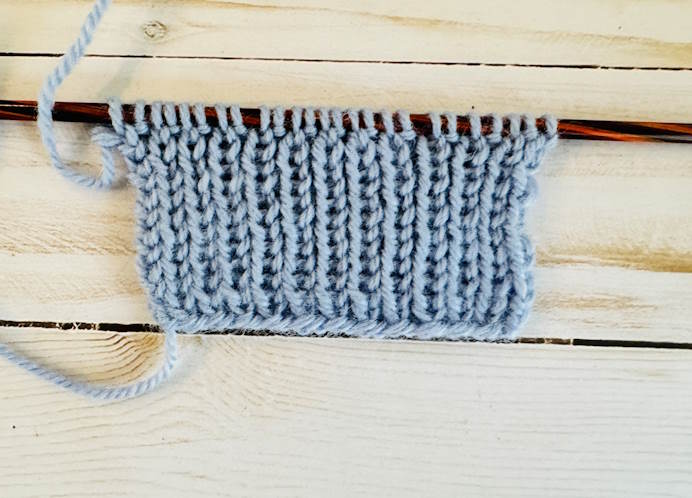 1 x 1 Ribbing
What is the 1x1 Ribbing Stitch?
The 1x1 rib stitch is a simple pattern alternating between knit and purl stitches in the same row, creating columns of knit and purl stitches that look like ribbing. This stitch is often used for cuffs, hems, and necklines because of its elastic properties. This is just one of many rib stitches available to knitters.
How to Knit the 1x1 Rib Stitch Pattern (aka K1, P1)
Before you can make 1 x 1 ribbing, you will need to know how to cast on, make a knit stitch and make purl stitches.
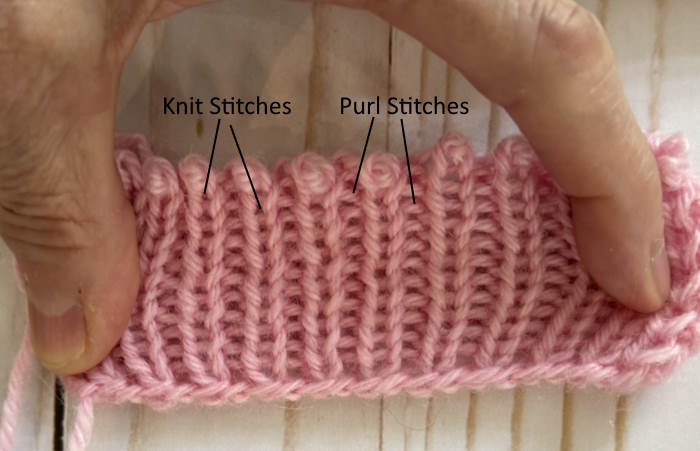 1 x 1 Ribbing Stretched to See Stitches
To create the 1x1 ribbing, you'll need to cast on an even number of stitches. Here's how to work the pattern:
Row 1: *Knit 1, purl 1; repeat from * to end of row.
Row 2: Knit the knit stitches and purl the purl stitches as they appear.
Repeat Row 2 for the desired length.
It's that simple! As you work the 1x1 rib stitch, the columns of knit and purl stitches start to form, creating a stretchy, textured fabric.
How the 1 x 1 Ribbing Looks in Knitting Instructions
Row 1: *k1, p1, rep from * to end of row.
Row 2: Rep row one until you reach your desired length.
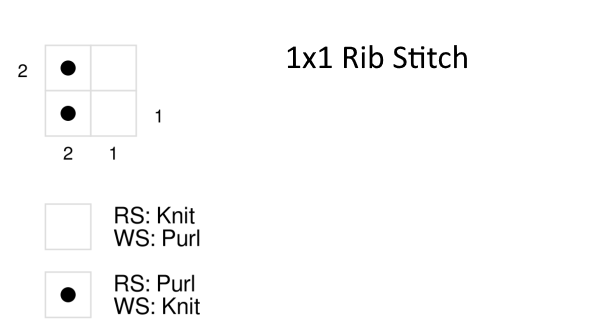 1 x 1 Ribbing Knitting Chart
Tips for Knitting the 1 x 1 Rib Stitch Neatly
To make this stitch look great, it's important to get everything just right. Here are some of my best tips.
Pay attention to your stitches
It's easy to knit when you should purl or vice versa accidentally. Take your time and double-check your work as you go.
Use the correct needle size
Using a too-large or too-small needle can affect the appearance and stretchiness of your ribbing.
Many patterns call for a needle size or two smaller than that used for other parts of the project. For example, when creating a rib at the hem, cuffs, or necklines, many sweater patterns suggest you use two sizes smaller needles.
Experiment with this; you may find that you don’t need to do this. The best way to find out is to create a rib gauge swatch and compare it to the pattern. You may find that you only need to go down one needle size or not at all.
Practice regularly
As with any new stitch, practice makes perfect. The more you knit the 1x1 rib stitch, the more comfortable and confident you'll become.
Become aware of where and when you knit. I found a great deal of variability in the appearance of my knit fabric depending on where and when I sat to knit.
Feeling tired, anxious, happy, and angry all affected how my stitches looked. Even the difference between sitting outside versus inside under artificial lighting made a difference.
The most significant change I saw depended on whether I enjoyed a cup of tea, coffee, or wine.
I soon discovered that if I wanted to do my best work, water would need to be my drink of choice. All of this is part of being mindful.
Tension is Key
Tension is Key to Knitting the 1 x 1 Rib Stitch
You may think the 1 x 1 rib is easy to master because it is generally one of the first stitches introduced to new knitters.
It is anything but easy, especially if you want to make it look neat. It may not be you at all, causing some stitches to be loose and wonky-looking.
Why?
Whenever you have patterns that call for cables, ribbing, or transitions from knit to purl stitches in the same row, you can experience tension problems.
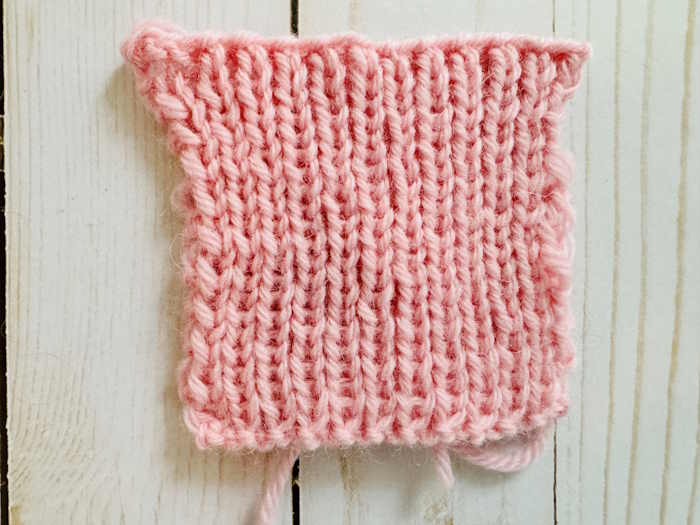 Here is an example of how NOT to knit 1 x 1 ribbing.
The swatch above shows ribbing at its worst. The edge stitches are wonky and uneven and the knit stitches all appear to be different sizes.
Sometimes, the knit stitches
appear bigger than they should when transitioning from knit to purl in ribbing
than the others.
Typically, there is no problem between the purl and knit stitch transition, so tension issues are not a problem. There are a couple of reasons why these problems occur in the knit-to-purl transition as opposed to the purl-to-knit transition.
- The amount of yarn needed to create the stitches is different
- How the yarn is moved from back to front and then around the needle.
Let me explain.
When making a knit stitch, you would go into the stitch, wrap the yarn around the needle, and pull through. This requires the yarn to travel about a 360 angle.
When you make a purl stitch right after the knit stitch, the yarn must travel from the back to the front and then wrap around the needle.
Thus, the stitch goes farther than the 360 degrees that the knit stitch does and uses more yarn. That extra yarn needed to make the purl stitch moves back into the previous knit stitch, making that stitch larger.
How to Correct Tension Problems
- One way to correct this is to tug the yarn after you make the knit stitch and before the purl stitch.
- Another way is to bring the yarn forward before the purl stitch in a tighter manner than you are accustomed to. In other words, pull on the yarn until you can see the bump under the stitch on the right needle.
- A third way is to begin the purl stitch typically but pull slightly on the working yarn before completing the stitch.
What if these methods do not work?
If these methods do not work, another way to reduce the excess yarn needed to make purl stitches is to wrap the yarn in the opposite direction as you would typically do. This reduces the amount of yarn so that the next stitch does not have to pick up that slack.
This method has only one problem, but there is an easy fix. If all you do is wrap the yarn in the opposite direction, you will end up with twisted stitches.
To compensate for this, on the next row, you would need to
either turn the stitch to the correct position on the needle or knit into the
back of the stitch.
If you find that you are having tension problems on the edges of the 1 x 1 ribbing, I recommend that you check my article on making edges neatly. Or for more information on tension in general, I recommend Knitting Even Stitches.
Where to Use 1 x 1 ribbing
The 1x1 ribbing is a versatile stitch that can be used in many different projects, such as:
- Cuffs on sleeves
- Hems on sweaters and hats
- Necklines
- Scarves
- Blanket borders
Incorporating the 1x1 rib stitch into your knitting projects adds texture, elasticity, and visual interest, making it a valuable technique for any knitter to master.
1 x 1 Ribbing: Pin for Future Reference
Last Words
In conclusion, learning how to knit the 1x1 rib stitch is an essential skill for beginner knitters. By following the simple pattern and practicing regularly, you'll soon be able to create beautiful, stretchy ribbing for all your knitting projects.
Remember to keep your tension consistent, pay attention to your stitches, and use the correct needle size for the best results. Happy knitting!
