- Home
- How to Knit: Basics
- what is kfb in Knitting?
What is kfb in Knitting? Learn How to Knit the Front and Back Increase
What is the Kfb in knitting? By Janice Jones
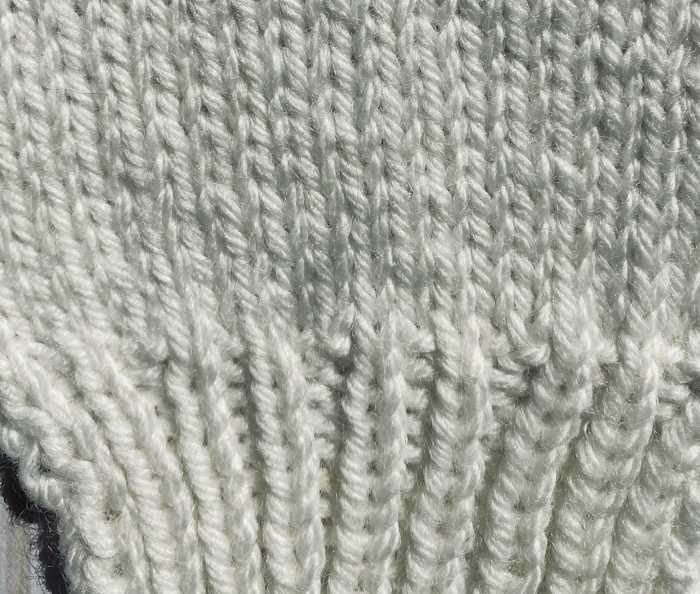
KFB in knitting means Knit Front and Back, a simple increase where one stitch becomes two. This means that you first knit into the front loop and then the back loop, creating two stitches where one used to be. This results in a little bar or purl bump that is visible. This increase is also referred to as a Bar Increase.
What is KFB in knitting?

- Definition: The kfb in knitting is a type of knitting increase where you need to add one additional stitch in a row or round.
- Abbreviation: Kfb stands for knit front and back, as suggested by the acronym. I have also seen it abbreviated as “K1fb” (knit 1 front and back) or p1f&b (purl one front and back).
- Appearance: The KFB stitch creates a subtle bump in the fabric. Since this stitch creates a slight bump or bar, it is also known as a bar increase.
- Other Names: Bar Increase
- Where It is Used: This stitch is commonly used in patterns that require gradual shaping, such as raglan sleeves or simple lace designs. It is also a popular choice for sweaters, particularly those with a ribbed section at the bottom edge.
- Identifying it in a pattern: The pattern directions often read, “increase evenly across row in the last row of ribbing.” The increases are noticeable but less so when hidden in the last row of ribbing. More about that later.
How to Make the KFB Stitch Step-by-Step
Now that we have a basic understanding of the KFB stitch let's dive into the step-by-step process of making it. Follow these instructions, and you'll increase stitches like a pro in no time!
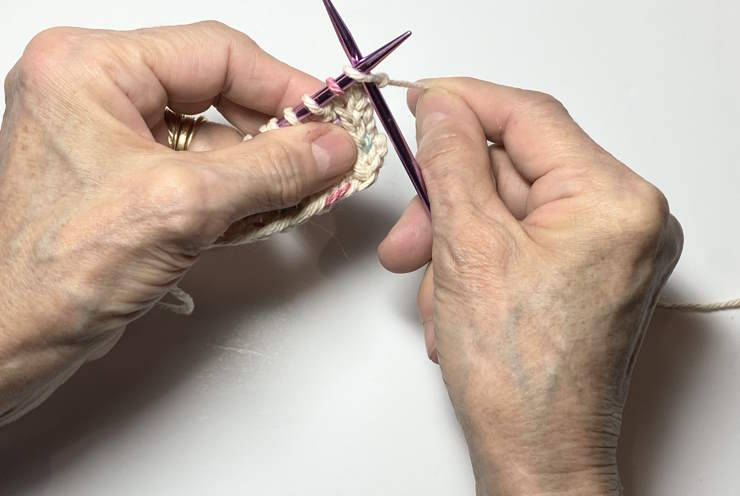
Step 1: Knit into the Front Loop of the Stitch
 This photo shows how to insert the right needle into the front loop. The typical way of beginning to make a knit stitch.
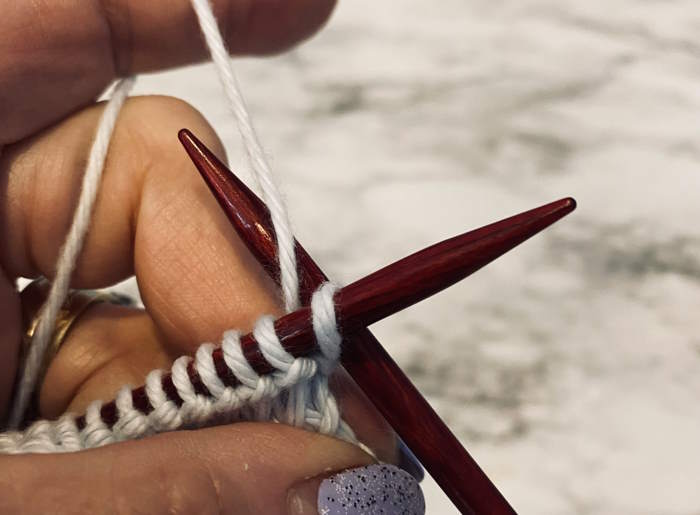
Step Two: Knit into the Back Loop of the Stitch
 This photo shows how to knit through the back loop of a stitch.
- Begin with your working yarn at the back of your work.
- Insert the right needle into the front loop of the next stitch, as if to knit. Wrap the yarn around the right needle from back to front like a regular knit stitch. Keep the original stitch on the left needle instead of sliding it off as you typically would.
- Insert the right needle into the back loop of the same stitch, again as if to knit. Wrap the yarn around the right needle from back to front, as you would for a regular knit stitch.
- Finally, slide the original stitch off the left needle, leaving you with two new stitches on the right needle.
Congratulations! You've completed the KFB stitch. Repeat these steps for each stitch you want to increase.
Increase Evenly Across the Row in the Last Row of Ribbing
This bit of instructions in a pattern is not unusual. Many designers use this verbiage to instruct the knitter that a specific number of increases must be made in the last row of ribbing before beginning the body of the sweater or vest. You might see something like this:
"Increase 5 stitches evenly across the last row of ribbing."
Don't worry if you are presented with this row of instructions rather than specific instructions on when to make the increases. You can calculate this on your own. How do you do the math?
You will need to know how many total stitches you have in the row and the number of stitches to increase (evenly across the row.) You will also want to determine where to place the first increase.
Example 1: 48 stitches total and 4 increase stitches. Place the first increase in the 3rd stitch from the end.
Steps:
Alternatively, you can use a free online calculator.
Understanding Knitting Increase
Increases are used to add stitches to your knitting, creating a broader or more rounded shape.
They can be necessary when knitting garments with shaping, such as sweaters or hats, or when working on intricate patterns requiring extra stitches.
There are several ways to single increase stitches in knitting, including
- Yarn overs
- Make one (M1): M1L, M1R, M1O
- Lifted Increases:
- KFB stitch
When I refer to single increase stitches, I mean increases that take one stitch and turn it into two stitches. These can be made on either the right or the wrong side of the fabric.
What is KFB in Knitting, Demonstration

What is the Difference Between the KFB and the PFB
The kfb (knit front and back) is always done on the knit side of the fabric. If you need to make increases on the purl side or wrong side of the fabric, it is called pfb (purl front back.)
To make a Purl Front Back (Pfb), work to the place where you need to make an increase.
- Make one purl stitch as normally, but do not remove the stitch from the left needle.
- Insert the right needle into the same stitch from the back of the stitch. Make another purl stitch and then remove from the needle.
Benefits of using the KFB stitch (or Bar Increase)
The KFB stitch offers several benefits, making it a popular choice among knitters.
- Firstly, while not entirely invisible, it does blend with the surrounding stitches. This works exceptionally well when making increases within ribbing.
- The KFB stitch is also relatively easy to execute, making it suitable for knitters of all skill levels. Whether a beginner or an experienced knitter, you’ll find the KFB stitch a breeze to incorporate into your projects.
- Furthermore, the KFB stitch creates a sturdy increase that is less likely to stretch out or distort over time.
This makes it an excellent choice for garments that require shape retention, such as sweaters or socks. With all these benefits, it’s no wonder the KFB stitch is a favorite among knitters!
Are there Disadvantages to Using the KFB Stitch (or Bar Increase)?
- The bump is visible.
- A hole can be created.
- If more than one increase is required, the pattern may instruct you to increase evenly across the row. This requires some math.
Different Ways to Use the KFB Stitch in Knitting Projects
The beauty of the KFB stitch lies in its versatility. It can
be used in various ways to achieve different effects in your knitting projects.
Here are a few ideas to inspire you:
- Raglan sleeves: The KFB stitch can create the gradual shaping required for raglan sleeves. By increasing stitches at specific points, you can achieve a seamless transition from the body of the sweater to the sleeves.
- Lace patterns: If you're working on a lace project and need to add stitches to create those delicate eyelet holes, the KFB stitch is perfect. Its subtle increase won't disrupt the intricate lace pattern.
- Shaping garments: Whether knitting a sweater, a hat, or a pair of mittens, the KFB stitch can help you shape your project to perfection. Use it to add stitches in specific areas to create curves or angles, ensuring a flattering fit.
- Increasing stitch count: Sometimes, you must increase your stitch count for a particular project section. The KFB stitch allows you to do this, such as at the end of a rib section.
Experiment with the KFB stitch in your knitting projects and discover its endless possibilities!
Comparison Between KFB and Other Knit Increase Stitches
There are more than one way to increase in knitting. How do they differ?
Technique: Kfb (Knit front and back)
About: A method where a stitch is made both in the front and back of a same stitch, creating a subtle bump
Observations: Less visible when worked into ribbing, Creates a sturdy increase
Difficulty Level: Easy
Suitable for: Raglan Sleeves, Lace Patterns, Garments
Technique: M1 (Make One)
About: Involves picking up the horizontal loop between stitches and knitting into it
Observations: Almost invisible when done correctly
Difficulty Level: Medium
Suitable for: Projects that require a subtle, nearly invisible increase
YO (Yarn Over)
About: Yarn is wrapped around the needle without knitting or purling into a stitch
Observations: Creates an eyelet hole
Difficulty Level: Easy to Medium
Suitable for: Mostly for lace patterns
Technique: Lifted Increase
About: Made by lifting the horizontal strand between stitches onto the left needle and knitting into it
Observations: Creates a tidy and almost invisible increase
Difficulty Level: Medium
Suitable for: Projects where a subtle increase is needed
Common Mistakes to Avoid When Using the KFB Stitch
While the KFB stitch is relatively straightforward, knitters can make a few common mistakes. Being aware of these pitfalls ensures your KFB stitch increases turn out beautifully every time. Here are some mistakes to avoid:
- Twisted stitches: When making the KFB stitch, inserting the needle into the correct part of the stitch is essential. Ensure you're knitting into the front and back loops, not the twisted part of the stitch. This will prevent your stitches from becoming twisted and creating a messy appearance.
- Uneven tension: As with any knitting technique, maintaining even tension is crucial when making the KFB stitch. Uneven tension can result in too tight or loose stitches, affecting your project's overall look and fit. Take your time and ensure consistent tension throughout.
- Skipping the second part of the stitch: It's easy to get carried away and forget to knit into the back loop of the stitch when making the KFB stitch. Remember to complete both parts of the stitch to create the desired increase. Skipping the second part will result in a missed increase and throw off the stitch count.
Alternative Methods for Increasing Knitting
While the KFB stitch is an excellent method for increasing stitches, it's not the only technique available. Depending on your project and preferences, you may find alternative methods more suitable for your needs. Here are a few popular methods for increasing in knitting:
1. Yarn overs: Yarn overs create an eyelet hole and are commonly used in lace patterns. They involve wrapping the yarn around the needle without knitting or purling into a stitch. Yarnovers are a versatile way to increase stitches and can be used decoratively or functionally.
2. Make one (M1): The make one (M1) increase is another common method in knitting. It involves picking up the horizontal loop between stitches and knitting into it, effectively creating a new stitch. Make one increases are nearly invisible when done correctly and are often used in patterns that require a subtle increase.
3. Lifted increases are made by lifting the horizontal strand between stitches onto the left needle and knitting into it. This method creates a tidy and almost invisible increase. Depending on the desired effect, lifted increases can be worked either on the same row or the next row.
These are just a few alternative methods for increasing stitches in knitting. Experiment with different techniques and find the ones that suit your knitting style and project requirements.
Conclusion: What is KFB in Knitting
Congratulations, my fellow knitters! You've now conquered the KFB stitch and demystified its secrets.
We've covered what the KFB stitch is, how to make it step by step, the benefits of using it, different ways to incorporate it into your knitting projects, common mistakes to avoid, alternative methods for increasing in knitting, tips for using the KFB stitch in your patterns, and fantastic resources to help you master this stitch.
Remember, practice makes perfect, so grab your needles and start experimenting. The KFB stitch opens up a world of possibilities for creating beautiful and intricate knitting projects. So go forth, my friends, and may your knitting adventures be filled with joy and creativity!
What is KFB in Knitting: Author Bio
Hi, I'm Janice, the person behind this website. I learned to knit and crochet at a very young age but didn’t get serious until obtaining this site in 2021.
Since then, I haven’t stopped creating and learning and now I’m a certified knitting and crocheting instructor through the Yarn Craft Council.
I’m retired and live with my husband and eight Shih Tzu dogs. My three adult children help in various roles. You might see Beth modeling some of my creations. Aaron is my technical advisor and Nick tackles accounting.


