- Home
- Types of Knit Stitches
- Knit Moss Stitch
How to Make the Knit Moss Stitch
By Janice Jones, Certified Knitting & Crochet Instructor (Craft Yarn Council) · Last updated December 2025
The knit moss stitch is a beginner-friendly stitch pattern that creates a dense, beautifully textured fabric that lies flat and looks the same on both sides. It’s made using only knit and purl stitches, yet the finished fabric feels professional.
If you’ve ever felt confused by the names moss stitch, seed stitch, Irish moss, or double moss stitch—you’re not alone. The stitch itself is easy. The terminology is what causes trouble.
This guide clears up the confusion and shows you exactly how to knit the moss stitch step by step, with written instructions, a chart, FAQs, and a beginner project to practice.
What Is the Knit Moss Stitch?
The knit moss stitch is a textured stitch pattern worked over a four-row repeat. Unlike seed stitch, which alternates knit and purl stitches every row, moss stitch works the same sequence for two rows before switching.
This small change creates a fabric that is:
- Thicker and warmer than stockinette
- Less stretchy than ribbing
- Fully reversible
- Resistant to curling
Because of these qualities, moss stitch is especially popular for scarves, cowls, blankets, washcloths, and other projects where both sides of the fabric will show.
Moss Stitch Names Explained
(This Is Where Most Confusion Happens)
The biggest source of confusion with moss stitch isn’t the knitting—it’s the naming. Different countries use different terms for the same stitch.
Here’s the simplest way to think about it:
- U.S. Moss Stitch = 4-row repeat (this tutorial)
- U.K. Double Moss Stitch = same 4-row repeat
- U.S. Seed Stitch = 2-row repeat
- U.K. Moss Stitch = same as U.S. seed stitch
You may also hear the U.S. moss stitch called Irish moss or American moss stitch. These names all refer to the same four-row pattern shown on this page.
Important: The box stitch (sometimes mistakenly called “double moss”) is a different pattern and should not be confused with moss stitch.
The Moss Stitch At a Glance
- Skill level: Beginner
- Also called: Irish Moss, American Moss, UK Double Moss
- Repeat: 4 rows
- Multiple: Any even number of stitches
- Fabric behavior: Lies flat, dense, reversible
- Best uses: Scarves, cowls, blankets, washcloths
 The Knit Moss Stitch (aka Irish Moss, American Moss)
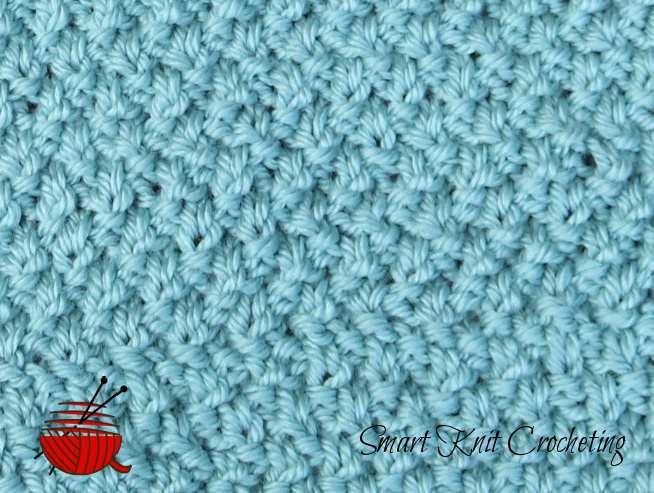
The Knit Moss Stitch is similar to the seed stitch, except the lovely texture is created with a more elongated seed stitch version.
It is always a good idea to check the origins of your pattern as you might think you are making the moss stitch when in reality, you are working the seed stitch and vice versa.
The size of the finished product might be different.
What is the Difference Between the Seed Stitch and the Moss Stitch
Remember the seed stitch is created with alternating knit and purl stitches in a simple two-row repeat:
Row 1: K1 P1
Row 2: P1 K1
In other words, you always knit the purl stitches and purl the knit stitches.
The Knit moss stitch is made by working two rows of the same pattern
Instead of alternating the pattern every row (as you do for seed stitch), you work 2 rows of the same sequence of knits and purls for moss stitch, and then the third-row alternates. This creates a beautiful textured but thick fabric that can be used to create a wide assortment of articles.
How to Make the Knit Moss Stitch (Flat Using Straight Needles)
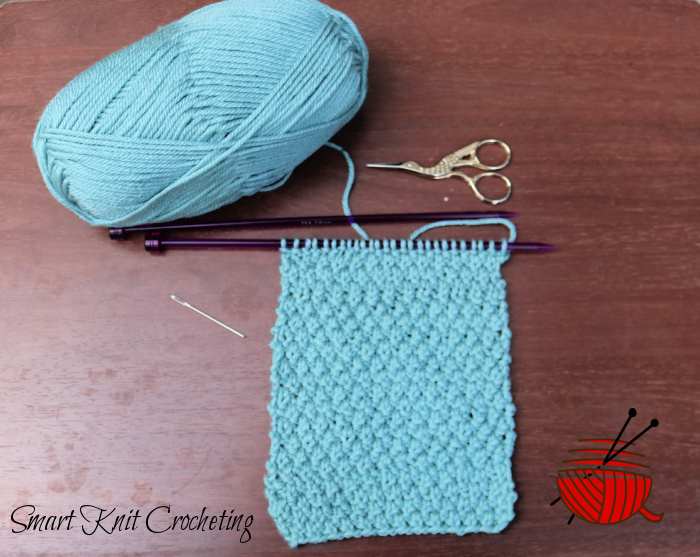
 Knit Moss Stitch
Abbreviations
K = Knit
P = Purl
Rep = Repeat
RS = Right side
St(s) = Stitch(es)
WS = Wrong side
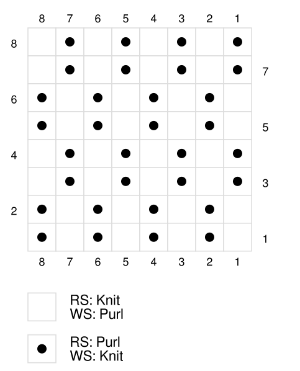
The pattern is worked in a four-row repeat & Even number of stitches
Row 1 (RS): *K1, P1. Rep from * to end of row.
Row 2 (WS): *K1, P1. Rep from * to end of row.
Row 3: *P1, K1. Rep from * to end of row.
Row 4: *P1, K1. Rep from * to end of row.
Repeat Rows 1-4 until 3 rows before the desired length. Rep Rows 1-3 once more and bind off in pattern as if working a Row 4.
 Moss Stitch (American Moss Stitch) British Double Moss Stitch, Irish Moss Stitch
How to Work the Moss Stitch in the Round on Circular Needles
Knitting the moss stitch in the round is actually easier than working it flat, because there is no wrong side. When working in the round, every round is worked from the right side, which makes the stitch pattern easier to remember and follow.
This makes moss stitch an excellent choice for cowls, hats, neck warmers, and seamless scarves.
Important: The stitch pattern itself does not change. Only the way you read the instructions changes.
Cast on any even number of stitches. Join to work in the round, being careful not to twist your stitches. Place a stitch marker to mark the beginning of the round.
Round 1: *K1, P1; repeat from * to end of round
Round 2: *K1, P1; repeat from * to end of round
Round 3: *P1, K1; repeat from * to end of round
Round 4: *P1, K1; repeat from * to end of round
Repeat Rounds 1–4 until your project reaches the desired length. Bind off loosely in pattern.
Common Knit Moss Stitch Problems (and How to Fix Them)
Even though the knit moss stitch is easy, there are a few common mistakes that can cause the fabric to look wrong. The good news? All of them are easy to fix once you know what to watch for.
Uneven Tension That Makes the Texture Look Messy
Moss stitch highlights differences between knit and purl tension more than stockinette does. Loose purls or tight knits can make the fabric look uneven. Tension problems are among the most significant issues beginners encounter, but tension improves with more experience.
How to fix it:
- Slow down when switching between knit and purl stitches
- Gently snug the yarn after purl stitches
- Practice on a small swatch before starting a larger project
- Blocking will help, but even a bit of tension while knitting makes the biggest difference.
Accidentally Knitting Seed Stitch Instead of Moss Stitch
This is by far the most common mistake. I know, I've done this many times, and it is likely because this is an easy stitch, and you are very relaxed and not paying attention. You may also be tired from knitting for too long.
If your fabric looks flatter and less textured than expected, you may be alternating your knit and purl stitches every row instead of every two rows.
How to fix it:
Remember that moss stitch uses a four-row repeat:
- Rows 1 and 2 are the same
- Rows 3 and 4 are the opposite
Stop and check periodically, usually after every couple of rows. By doing this you can fix your mistake without having to rip out too many rows.
Losing Track of Which Row You’re On
This one goes along with the one above. Because moss stitch changes every two rows, it’s easy to forget where you are, especially if you set your work down mid-project.
How to fix it:
- Use a row counter or tally marks to keep track of the row you are on.
- Placing a removable stitch marker every four rows can also help beginners stay on track.
- Or glance at your fabric: If the last stitch you worked was a knit bump, the next row likely needs to repeat the same sequence.
Does Moss Stitch Affect Gauge or Drape?
How Moss Stitch Affects Gauge
Stitch Gauge
- Moss stitch is slightly wider than stockinette
- It does not pull in like ribbing
- Width is relatively stable and predictable
Row Gauge
- Moss stitch produces shorter rows than stockinette
- The fabric builds height more slowly
- Projects may end up shorter than expected if you don’t measure as you go
Yarn Usage
- Moss stitch uses more yarn than stockinette
- Less yarn than heavy cables or brioche
- Expect slightly higher yardage needs
How Moss Stitch Affects Drape
Moss stitch creates a denser, more structured fabric. This means:
- Stands away from the body more than stockinette
- Holds shape well
- Feels warm and substantial
- Less fluid movement
This is why moss stitch works beautifully for:
- Cowls
- Scarves
- Blankets
- Washcloths
…and why it’s not ideal for:
- Flowing garments
- Lightweight shawls
- Projects that need stretching
Frequently Asked Questions about the Knit Moss Stitch
Does the knit moss stitch pattern lay flat or tend to curl?
This is a great pattern if you want a fabric that will lay flat. It is also easy to block.
Is this stitch reversible?
Yes, the right side or public side looks exactly as the wrong side so it is perfect for articles where you’d want both sides to show as in a blanket.
Can you Explain the Difference between the American Moss Stitch and the Irish Moss Stitch?
Though the names are different, both mean the same thing and follow a four row repeat. The Double Moss Stitch is just one more name that means the same thing.
How does the American Moss Stitch Different from the Moss Stitch in the U.K.
The American Moss Stitch uses a four row repeat where the British Moss Stitch uses a two row repeat which is also identical to the American Seed Stitch.
How will I know which one to use?
Check your pattern. It should describe exactly how you should knit your article. If you are knitting without a pattern, it is your choice. Both the seed and the moss stitch produce a thick textured fabric.
What Can you Make with the Knit Moss Stitch?
Since the knit moss stitch is straightforward and beginner-friendly, it’s a great pattern for practicing those new knitting skills. It creates a beautiful, textured fabric that can be as thick as you like.
There are so many different possibilities.
Washcloths, mats, coasters, and scarves are just a few of the straightforward projects to try out this stitch. Consider a thick cowl or a heavy jacket made with bulky yarn and big needles.
A chunky warm blanket for those cool winter nights would also make an excellent gift for a special person.
For something super easy, why not try a cowl?
FREE and Easy Knit Moss Stitch Cowl
Here is an easy project that you can make to practice your moss stitch. It is made in a Number 5 worsted-weight yarn, but if you prefer, you could use a number 6 chunky yarn with a larger needle.
Pin for Future Reference


