- Home
- How to Crochet
- Crochet in the Round
How to Crochet in the Round
Crochet in the Round, Re-written by Janice Jones,
The crochet in the round technique significantly broadens possibilities of crocheting. There are many projects which we can't even think of using crochet in a row technique only.
Here are typical projects, which can be done using this kind of technique: hats, doilies, granny squares, triangles, ovals, buttons, flowers, top-down sweaters, and so on.
You are working in the round to create flat pieces of fabric, but there is another way to look at crocheting in the round: making tubes.
With tubes you can make can cozies, wrist warmers, baskets and create the pieces needed to make Amigramini.
This is the first in a two-part series that teaches you how to crochet in the round. Part two will help you learn how to read crochet charts, which are easier to use when you crochet in the round.
As a beginning crochet lover, once you get your fill of flat washcloths, scarves or blankets, you might want to venture into crocheting in the round. By starting with a little circle, your world becomes almost endless with possibilities.

First Steps When You Begin to Crochet in the Round
Any "crocheting-a-round" project begins from a central ring. A central ring for this kind of projects is the same as a foundation chain for the "crochet-in-the-row" projects. The traditional way to form a central ring is to join several chain stitches, at least 3 but often up to 5 chains together with a slip stitch.
But some people prefer to start with the magic ring technique. I suppose you could call it magical because it is adjustable and leaves only a tiny hole or none at all.
Project Ideas to Practice Crochet in the Round
Some of the easiest and most useful projects to start with include
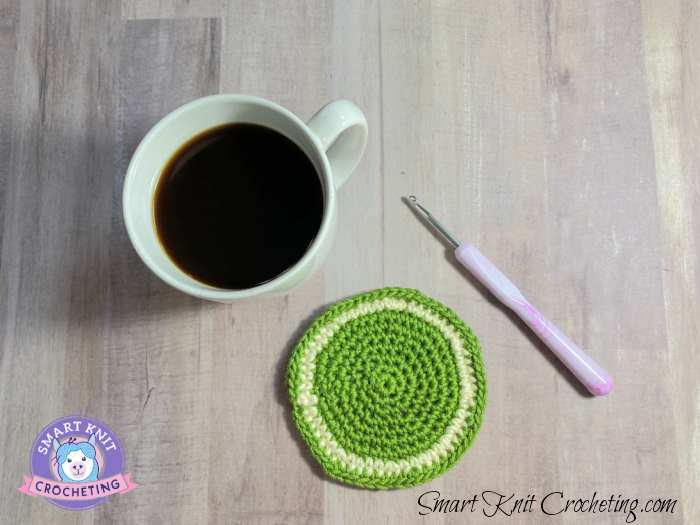
Coasters
Round trivets
Granny squares
Then, work your way up to hats, mittens, and many other wearables, even amigurumi.
Challenges When You Crochet in the Round
The most important moment while you crochet in the round is preventing it from buckling or curling, especially if you want your project to lay flat.
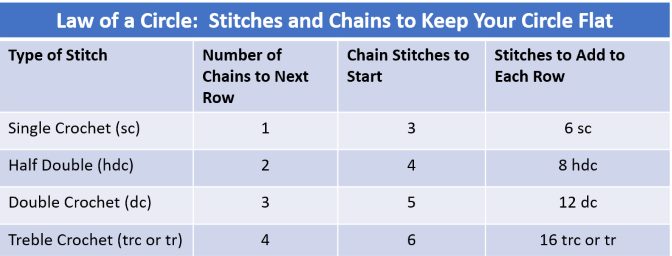
There are some certain rules for increases, to be added in every new circular row in order to keep our fabric lying flat. We call it "A Law of a Circle. For example, crocheting single crochets will gain radius of the next round less than if you would crochet double crochets.
Hence, number of increases per each new row depends upon the type of stitch you use for crocheting your circle.
Crochet Rule of a Circle

By following the chart above, if you want to make a circle using double crochet, you would chain 5 and connect with a slip stitch, then make 3 chains which also act as your first double crochet. You would then begin the circle with a set number of stitches say 8 and join with a slip stitch. Working the second round, you would need to add an additional 8 stitches making the total 16.
It sounds somewhat confusing from the first glance, but once you understand the logic of increases and gain some experience, you won't have any troubles designing your own projects.
Typical Abbreviations You May Encounter When Your Crochet in the Round
These abbreviations are in US Terms
sc: Single Crochet
dc: Double Crochet
sl st: Slip Stitch
rnd: Round
ch: Chain
sp: Space
Two Basic Methods for You to Crochet in the Round
There are two basic methods for working crochet into a circular fabric:
Rounds: Each round is worked separately and connected to the next with a slip stitch into the back loop of the first stitch in the round.
Spirals: For spirals, no slip stitches are used. You simple start working the next round into the previous one. It is hard to know where the last round began unless you mark it with a stitch marker.
Both types of working in the round can be accomplished with any type of crochet stitch, the easiest of course are single crochet, half double crochet and double crochet. (US Terms)
How to Begin to Crochet in the Round
As mentioned above, you first need to make a chain stitch ring or use the magic circle technique. Either way, you end up with a circle where future stitches for the first round will be worked. The next step is to chain enough stitches to work up to the height of the type of stitches you will work into the circle.
As a rule of thumb:
Ch 1 for single crochet
Ch 2 for half double crochet
Ch 3 for double Crochet
Ch 4 for treble crochet
(see chart above)
As it turns out the circle space can be small especially if you have a considerable number of stitches to work. It's helpful to hold onto the circle with your non-dominant thumb and forefinger to keep the circle open.
As you work, use your fingers to push the worked stitches around so you have room for more.
Following a Pattern or Creating Your Own
Obviously if you are working from a pattern, you will want to follow the instructions of the designer. If you'd like to try making a solid round of stitches on your own, say to create a coaster, here are a couple of useful tips.
Crochet in the Round Tutorial with Half Double Crochet: Directions
You will need yarn and the appropriate size hook. For the purposes of this tutorial, I am using a size US G/4.25 mm and Number 4 Worsted Weight 100% Wool Yarn.
Abbreviations used below:
Ch: Chain
Sl st: Slip Stitch
rnd: Round
hdc: half double crochet
* * work pattern between * and *
Directions for Half Double Crochet: Crochet in the Round
Ch 3 and connect with a sl st. Ch 2 (counts as the first half double crochet.
Rnd 1: Work 7 hdc in ring, sl st in back loop of top of ch-2. (8 hdc)
Rnd 2: Ch 2 (counts as first hdc throughout), hdc in same hdc space, 2 hdc in each hdc around, sl st in back loop of top of ch-2. (16 hdc).
Rnd 3: Ch 2, hdc in first hdc, *hdc in next hdc, *2 hdc in next hdc, hdc in next hdc* rep from* around ending with hdc in last hdc, sl st in back loop of top of ch-2. (24 hdc).
Rnd 4: Ch 2, hdc in first hdc, *hdc in next 2 hdc, 2 hdc in next hdc, repeat from * around, sl st in back loop of top ch-2, (32 hdc).
Rnd 5: Ch 2, hdc in first hdc, *hdc in next 3 hdc, 2 hdc in next hdc,* Repeat from * around, sl st in back loop of top ch-2, (48 hdc).
Rnd 6: Ch 2, hdc in first hdc, *hdc in next 4 hdc, 2 hdc in next hdc,* Repeat from * around, end with sl st in back loop of top ch-2 (56 sts).
Continue for a larger circle in the same pattern increasing 8 stitches each round or fasten off and use as a coaster.
Crochet in the Round Using a Single Crochet Stitch

Crochet in the Round Using a
Double Crochet Stitch

Crocheting in the Round Part Two
Hop on over to part two: How to crochet in the Round Using Crochet Charts.
About Janice
Hi, I’m Janice, the voice behind Smart-Knit-Crocheting. I love to knit and crochet and even more, I love teaching others what I know.
Though I learned to knit and crochet as a child, I didn’t get serious about these amazing hobbies until I retired. I’m a certified knit and crochet instructor through the Craft Yarn Council and am working on becoming a Master Hand Knitter through The Knitting Guild Association.
I’m currently living with my husband of over 50 years and our 6 Shih Tzu dogs.
I love hearing from you, so please drop me a line and let me know what you’re working on, whether you love knitting or crocheting more, and if you have any questions. Please visit my about me page for more information.
Happy Crocheting


