Cardigan Sweater for Women
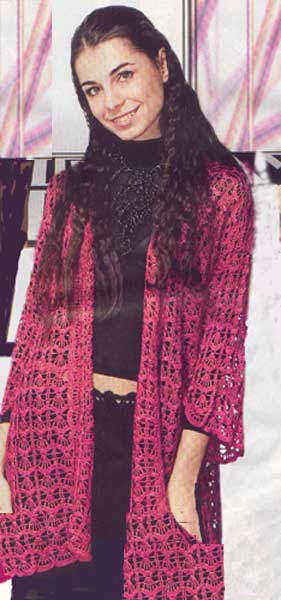
There is nothing unique in this women's cardigan sweater. A simple pattern with the drop shoulders and cylindrical torso, a simple stitch pattern.
But there is something in this simplicity that catches your attention right away. It looks like the answer is obvious.
A designer who has created this cardigan had a clear idea about the features of the drop-shoulders designs and how to manage them.
I think there are three major moments which we're taking into consideration, to make an eye-catching cardigan sweater:
1. A cardigan doesn't have to fit you exactly. A little extra ease will compliment both this women's cardigan and its owner.
2. It has to be long enough. Large elements of the stitch pattern require enough room to demonstrate their charm. Besides that a long silhouette will make you slender.
3. The number of the hook and thickness of yarn have to provide soft and easily draped fabric. It will allow cardigan to wrap the shoulders with smooth and natural lines.
As usually, I don't suggest you to follow my example exactly. Let's look at the picture first, to understand the key moments of our project.
 Cardigan for Woman. Duplet # 73.
As an example, we will use a drop-shoulders sweater pattern discussed earlier. To make it look like our cardigan, a few changes have to be introduced. Follow the steps below, to make them.
How to crochet a cardigan sweater

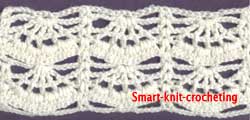
Step 1. Make a gauge swatch (40 stitches) using a cardigan stitch pattern. There are three identical repeating vertical patterns and four rows crocheted twice (eight rows total) in this swatch.
Measure height of the swatch and
divide it by two. It will be width of the vertical bands for the
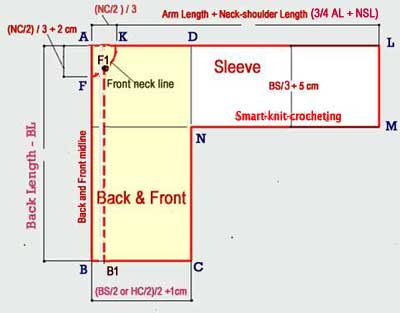
front part (see the shape FF1BB1 on the pattern below). For
example, height is equal to 10 cm. Distance FF1 = BB1 = 10 cm / 2 =
5 cm.

Step 2. This sweater has a 3/4 long sleeve. Hence, for our example distance AL = 3/4 Arm Length + Neck-Shoulder Length = 3/4 AL + NSL = 3/4 x 56cm + 13 cm = 55 cm.
Step 3. Calculate the number of stitches necessary to start your back and front part of the cardigan.
You can crochet two front parts and back part separately and sew them together. But when you use a stitch pattern which has the large fragments like this one, it is much better idea to crochet all parts together.
You will have much more freedom altering the number of stitches if necessary.
According to our pattern, the total width of cardigan is equal:
2 x B1C + 2 x BC.
If you look at the cardigan picture above and compare it to your gauge swatch, you will notices that the festoons of the hem line and sleeves "look" downward. It shows us direction of crocheting - from top to bottom.
Nothing terrible happens if you use opposite direction of crocheting. But the edges will look differently.
Step 4. Calculate the number of stitches necessary for sleeves of the cardigan sweater. Start the sleeves from the shoulder and continue to the bottom hem.
Check how to calculate number of stitches on the Beginner Crochet page. International crochet symbols for charts can be found on the Crochet Patterns page.
About Janice
Hi, I’m Janice, the voice behind Smart-Knit-Crocheting. I love to knit and crochet and even more, I love teaching others what I know.
Though I learned to knit and crochet as a child, I didn’t get serious about these amazing hobbies until I retired. I’m a certified knit and crochet instructor through the Craft Yarn Council and am working on becoming a Master Hand Knitter through The Knitting Guild Association.
I’m currently living with my husband of over 50 years and our 6 Shih Tzu dogs.
I love hearing from you, so please drop me a line and let me know what you’re working on, whether you love knitting or crocheting more, and if you have any questions. Please visit my about me page for more information.
Happy Crocheting


